
Supplemental Strength Training
Purpose
Volleyball is a high-impact sport. Running, jumping, spiking, and landing are high-force activities that build explosive power. The best thing you can do to build your explosive power for volleyball is to play volleyball at high intensities. Speed and power largely comes from signals from your brain (nervous system) and is fairly specific to the movements and speed of the action. Put simply: if you want to jump higher, you need to jump a bunch, at maximum intensity, and then recover. Traditional strength training will not necessarily help you run faster, jump higher, or spike harder. However…
Supplemental strength work can play an important role in improving your power. Here’s how it works:
Whenever you produce explosive power, your body needs to (a) absorb force (“eccentric control”) and (b) stabilize your joints in challenging positions (“isometric stability”). If you can’t absorb force as you load up for a movement (like when you squat down briefly before jumping up to block) and if you can’t stabilize your joints in those positions, your body won’t produce as much force as it’s capable of.
What happens if you lack eccentric control and/or isometric stability?
Your nervous system is finely attuned to risk. It does not like danger. So what we see with athletes who lack eccentric control or isometric stability is:
Their nervous system will put an intuitive check on their power. Your body doesn’t want to go at a speed too fast for it to stop. Your power will be subtly curbed and/or not continue to improve if your body feels like you are not absorbing and stabilizing force.
The adrenaline of competition can and does allow athletes to override this built-in braking mechanism. This overwhelms the supporting muscle/tendons/ligaments and leads to stress and damage. Worst-case, this leads to injuries like shin splints, patellar tendinitis, and rotator cuff injuries. But even if the stress isn’t enough to completely sideline you, it will be enough to curb your explosive power. Very few athletes increase their vertical jump while they are battling knee pain. Habitually sore shoulders eventually lead to a decrease in spiking velocity.
Therefore, the purpose of this workout is to build eccentric control and isometric stability.
Overview
This workout has three sections:
Foot/Ankle
Legs/Hips
Shoulders
These workouts can be done 2-3 times per week on non-practice days. Monday and Friday is great, but Monday and Wednesday or Wednesday and Friday can also work well.
Timing and Implementation
Each section consists of a round of exercises. Doing 1 round is good. If you have time and aren’t too fatigued, doing a second round is ideal. (But don’t let perfect be the enemy of good, doing just 1 round will benefit you and, especially at the beginning, be plenty challenging!)
Each round takes 6-12 minutes, so if you do both rounds, a section will take 12-24 minutes
Best case: do 2 rounds of all 3 sections. (50-60 minutes)
Alternative #1: do 1 round of all 3 sections (25-30 minutes)
Alternative #2: do 2 rounds of 2 sections (30-40 minutes) or even just one section (15-20 minutes)
Doing a little is better than doing none at all!
If you are short on time, prioritize your weak points.
Foot/Ankle Section
These exercises are performed with either the Toepro or a Slantboard.
One full round consists of:
Toepro Position 1 Calf Bounces x 30s
Toepro Position 1 Toe Pulses x 30s
Straight Leg Calf Isometric Hold x 30s
Toepro Position 2 Calf Bounces x 30s
Toepro Position 2 Toe Pulses x 30s
Bent Leg Calf Isometric Hold x 30s
Toepro Position 3 Calf Bounces x 30s
Toepro Position 3 Toe Pulses x 30s
Bent Leg Calf Isometric Hold x 30s with body turned
Tib Band Pulses x 30s
Tib Band Isometric Hold x 30s
Here’s an example of a full round of this circuit:
You can see I have a timer set and I’m going directly from one exercise to the next. In the beginning, you won’t be able to do that, but eventually you can work toward that. I paused my timer when I went to use the tib bands, because they take a minute to get set and strapped up.
The first time you do these exercises, your foot and lower leg will be burning. These exercises are challenging, especially if you are weak in these areas as many athletes are!
The first few times you perform these exercises, it’s okay to only do 1 round (instead of 2) or to even only do 1 or 2 of the Toepro positions (do the Tib Bands every time) if you find that your foot/ankle/calf is too fatigued.
Here are the foot positions for the Toepro:
Position 1
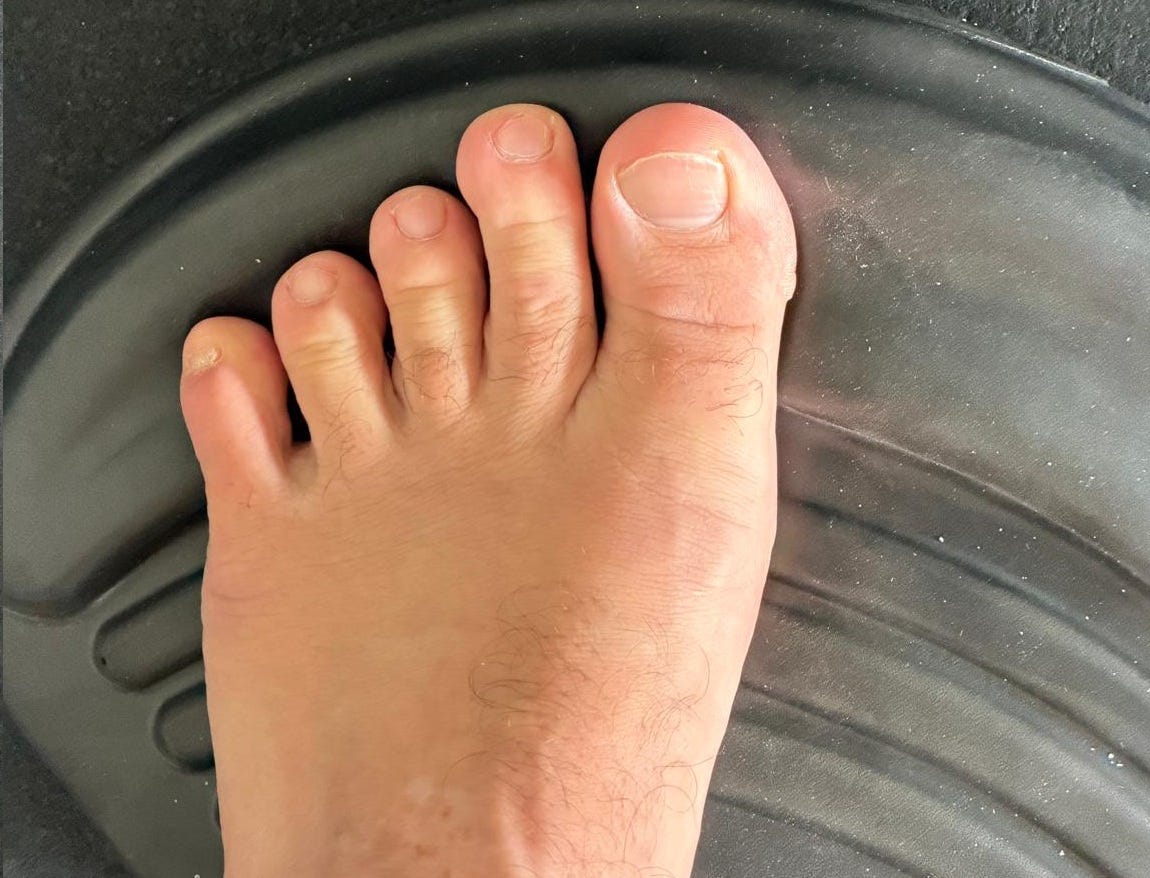
You want your toes to straddle the top crest. When you’re doing the Calf Bounces, bend your knee a little and bounce your heel up and down. Push through your forefoot which will be gripping the top crest of the Toepro.
When you do the Toe Pulses, sink your heel down so it’s almost touching the ground and then pulse your toes into the crest of the Toepro as hard as you can for 30s.
When you do the Isometric hold on the slant stack, keep your leg straight. You’ll feel a big stretch high in the calf near the knee. Sink down until your heel is close to touching and hold.
Position 2
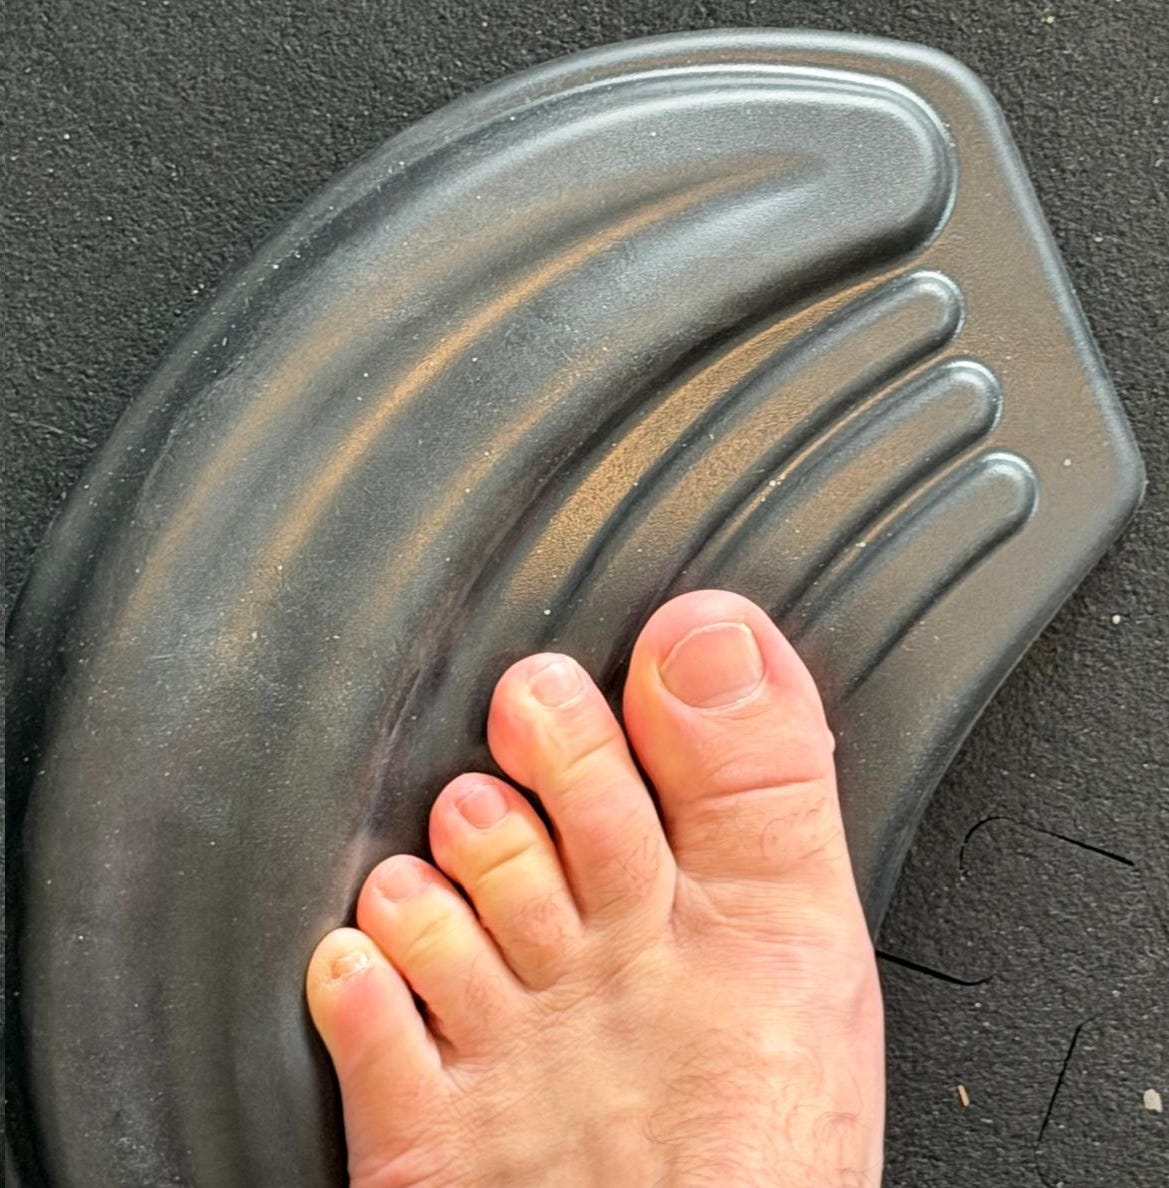
Now you’ll orient sideways. There’s a vertical crest that divides the Toepro and I find I get the best feel if I have my big toe go over that. When you do the Calf Bounces you bend your knee slightly and bounce your heel up and down for 30s, same as in Position 1. Try to keep your body straight up and down and not buckle in at the bottom. (This is the whole point of the Toepro: it puts your foot and ankle in different positions, which builds strength and resilience.)
When you do the Toe Pulses, drop your heel down so it’s almost touching the floor and pulse your toes into the Toepro. As you gain proficiency in this position, you’ll find that as you dig your toes in this position, it should also raise your arch. This position is great for strengthening your arches.
When you do the isometric hold using the slant stack, push your knee forward, and then drop your heel down until it’s almost touching. If you feel a stretch in your calf, it will be lower, down by the Achilles tendon that runs from your heel up to your calf.
Position 3
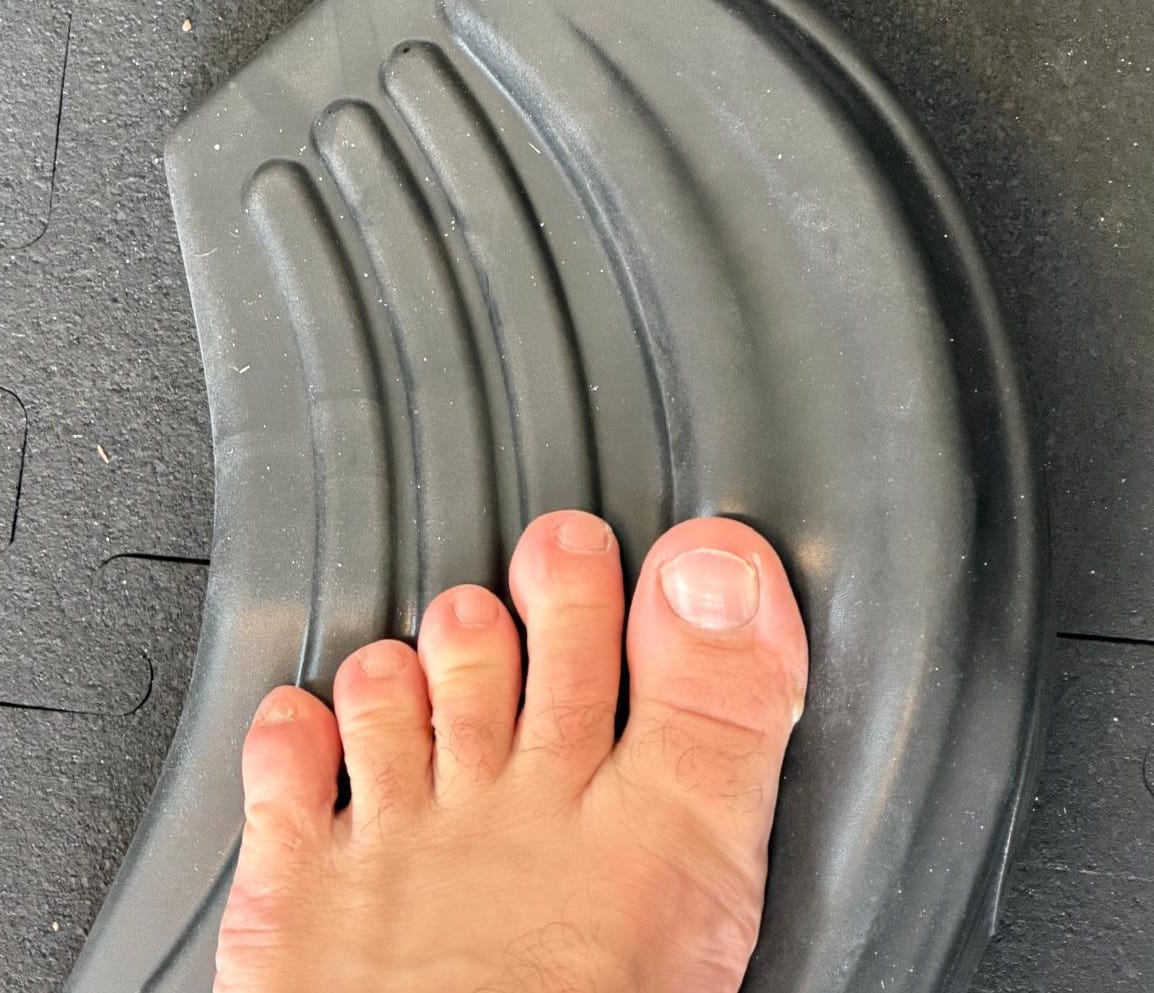
Now orient your foot the other way, so that your big toe is up on the high crest. Do your Calf Bounces the same fashion as the other two positions. Again, try not to buckle or roll at the bottom. When you raise your heel, try to drive your big toe down into the toe pro and come up and in a little bit.
And when you do the Toe Pulses, you’ll again drop your heel down to almost touching the ground and then push your toes into the Toepro as hard as possible. This position is designed to maximally stress the big toe and its supporting muscles and ligaments, which are critical in speed and agility.
When you do the isometric on the slantboard, do the same bent-leg calf hold as earlier, but then turn slightly inward (so, with your left leg, turn to the right… with your right leg, turn to the left) which you’ll find will create a slightly different stretch and stretch in the Achilles region.
This is how I set up the Tib Bands:
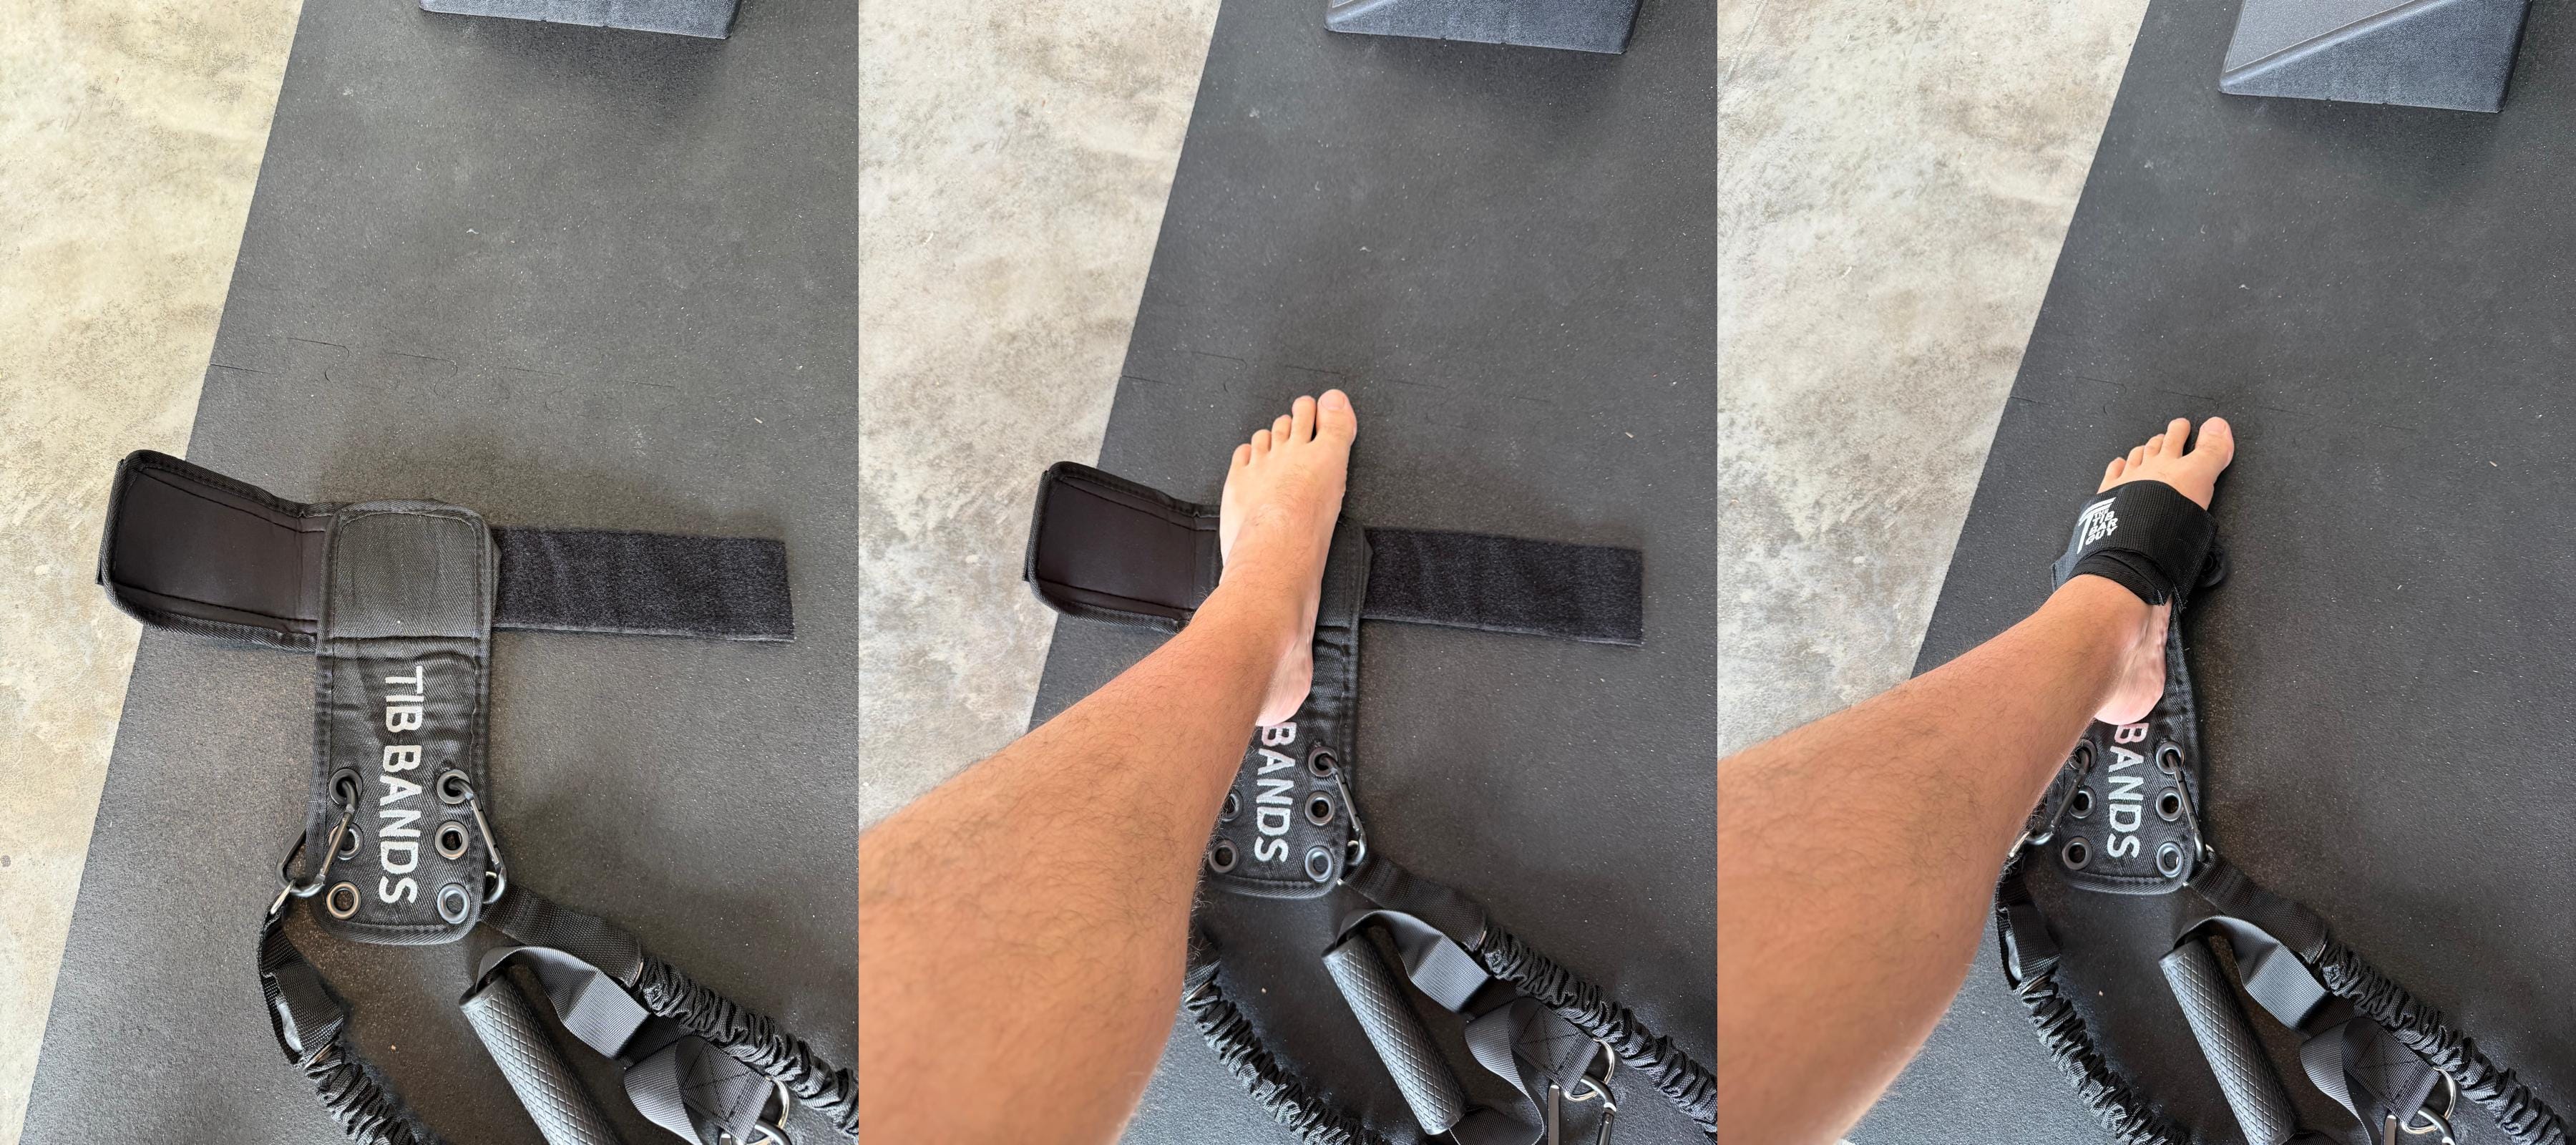
I use the top rings to attach the bands and I push my foot up pretty high and strap it in really tight. To be honest, the Tib Bands work a little better with a shoe on, because you have a bigger/firmer platform to push through and gain band tension, but I find it too much of a hassle to put my shoe back on, because the Toepro stuff must all be done barefoot.
You’ll experiment with how you position your leg and how you hold the bands to find a good amount of tension and resistance to pull your foot into. The position you are trying to stress is your toes pulling up to the sky and toward your shin. If you do this right you should feel it in muscle on the front and outside of your shin, especially down by your ankle.
This video has excellent detail and explanations of the Toepro positions and exercises:
Leg/Hip Section
For these exercises, you’ll want your Slantboard, Glute Bands, and your Glute-Ham Slider. As you get really strong on the split squats you’ll eventually hold a dumbbell or weight plate.
One full round consists of:
Split-Squat Isometric Hold x 30s each leg
Single Leg Squat Controlled Eccentrics. 3 reps each leg. (Try to make each rep last 10s, so that a set of 3 reps takes 30s)
Glute Bridge Isometric Hold x 30s each leg
Glute-Ham Slider Eccentrics. 3 reps each leg. (Try to make each rep last 10s, so that a set of 3 reps takes 30s)
In the exercise demos below, you might notice that I’m looking off-camera at a timer. Use a timer for these exercises.
I try to do each set “on the minute,” meaning I start the stopwatch and begin the first set. That takes 30s to complete, so I have 30s rest before I need to start the next set. If you do it this way, one full round of these exercises takes 8 minutes. Ideally, you would then go immediately into round two, but, in the beginning, you may either (a) only be able to complete one round or (b) need 2-3 minutes in between rounds for a little more recovery.
It’s also okay, in the beginning to just do the isometric holds and then only 1 or 2 reps of the controlled eccentrics instead of all 3 reps. And it’s okay if your controlled eccentric reps only last 3-5 seconds instead of 10 seconds. Don’t overdo it and focus on the positions and control of the movements. Remember, what we are trying to do is train stability and control of the supporting muscles/tendons/ligaments, so there’s no sense in doing extra reps on paper but with poor form and no control.
Split-Squat Isometric Hold
Put your heel up on the slantboard. (It’s not necessarily wrong to have your whole foot on the slantboard, but mostly athletes find it slightly more stable with the ball of my foot on the ground and heel raised.)
Push your knee forward and bend the front leg, while keeping the back leg as straight as possible and your body upright. Don’t sit down on your back leg and definitely do not let the back knee touch the ground! Push forward on the front leg. Find the most difficult part in the movement, which will generally be almost all the way down, but before your thigh starts resting on your calf.
I show a few arm/hand configurations. Holding your waist seems to make the hold a little easier. Letting your arms hang is a little harder. Holding your hands in the air is a bit harder still. If you can complete 30s like that, you can start holding a dumbbell or plate to make it more difficult. If you need to make things easier, you can hold on to a chair or doorway to take some pressure off your leg at the bottom.
Single Leg Squat Controlled Eccentrics
There’s 3 variations here. The most difficult variation is to have your non-working leg completely off the ground. Very few athletes will start with this variation:
As you can see, maintaining full, slow eccentric control for me is challenging, and by the third rep my leg is pretty cooked and I need a little help from my left foot to finish the set. That’s no problem!
If you can’t do unassisted reps, or you can’t control the eccentric at all (which will be the case for most athletes, especially when first building this strength), use put your other leg out in front of you with the heel resting on the ground. You can put light pressure to give a little assistance and a little more pressure if you need more assistance. So instead of the leg on the slant board doing 100% of the work, it’s doing about 70-90% of the work and your other leg gives some assistance.
If you need more assistance than this (and many of you will!), then put the full other foot on the ground and put plenty of pressure on it. In this way, the slant board leg might only do 55-60% of the work — or even less if you are dealing with knee pain. The point is to build eccentric control through the full range of motion, which the slant board forces you to do. Give yourself as much assistance as you need. Most athletes will start here.
Glute Bridge Isometric Hold
Loop one of the glute bands under your heel and then up into the crease of your hip. Cross your other foot over your working leg and then bridge up, pushing your hip up into the air. Squeeze your glute to try to maintain the highest position you can hold for 30s.
Glute-Ham Slider Eccentrics
Your goal is to look like Level 4 in this video. The lower you have your hips, the easier the exercise is. If you’re really struggling, you can lightly rest your non-working foot on the ground to take some tension off.
Shoulder Section
For these exercises you’ll need your orange band as well as light weights, either with your Torque Bar or a light dumbbell or plate.
One full round consists of:
External Rotation Eccentrics. 3 reps each arm. (Try to make each rep last 10s, so that a set of 3 reps takes 30s)
Band Pull-Apart Hold x 30s
Powell Eccentrics. 3 reps each arm. (Try to make each rep last 10s, so that a set of 3 reps takes 30s)
Y-Raise Hold x 30s
In the exercise demos below, you might notice that I’m looking off-camera at a timer. Use a timer for these exercises.
I try to do each set “on the minute,” meaning I start the stopwatch and begin the first set. That takes 30s to complete, so I have 30s rest before I need to start the next set. If you do it this way, one full round of these exercises takes 6 minutes. Ideally, you would then go immediately into round two, but, in the beginning, you may either (a) only be able to complete one round or (b) need 2-3 minutes in between rounds for a little more recovery.
Once you get a hang of these exercises and doing them “on the minute”, 2 rounds of the shoulder section should only take 12 minutes — or a little more if you do some of the extras that I have listed at the bottom of this page.
External Rotation Eccentrics
Try to just let the shoulder rotate in the socket and stretch a little at the bottom. Don’t try to pull the weight up or curl the weight up. Let the shoulder just rotate in the socket.
Use a light weight, for most high school athletes, 2-5lbs is more than enough to start.
Band Pull-Apart Hold
I turn in the video so you can see the different angles. I’m pulling the band to my collarbone and squeezing my shoulder blades together. You can see that my hands are not even with my shoulders, they are behind my shoulders when viewed from the sides, because I’m squeezing my shoulder blades together as much as possible.
The first time you do the exercise, grip the band near the outside as it will be easier. As you get stronger, you can move your grip in slightly to make the band harder to pull apart.
Powell Eccentrics
On the way down I’m spreading my shoulder blades apart and reaching the weight as far forward as possible on the way down. On the way up, I squeeze my shoulder blades together. The feel of these should be similar to the band pull-apart because you are working similar muscles — the difference is that the band pulls are harder in the shortened position (shoulders squeezed together) while the Powells are harder in the lengthened position at the bottom.
Use a light weight, for most high school athletes, 2-5lbs is more than enough to start.
Y-Raise Hold
Lie on the ground with your arms in a Y-position above your head. You’re looking for about a 45-degree angle which means not straight to the side like a “T” or straight over your head like an “I” but 45-degrees like a Y. From there, point your thumbs at the ceiling and lift your arms. The key here is to have the movement again come from squeezing your shoulder blades down and in and lifting your shoulders, not arching your back.
This video is a good example.
For most athletes, simply holding this position for 30s will be challenging. Strong athletes might hold some very light weight, but even a 2.5lb plate will be too hard for most. A can of soup weighs about 1 pound and is actually a good first step to weighting this exercise. If you are holding weight, make sure you still keep the thumbs pointing at the ceiling and not in toward your head.
Supplemental Shoulder Exercises
Eccentric Chin-Ups
If you have access to a pull-up bar, eccentric chin-ups are a good supplemental exercise. If you are new to chin-ups, you’ll have to give yourself a boost by jumping up to the top and then trying to lower under control. Aim for 3 reps with as much eccentric (lowering) control as possible. Ideally, you’re going for a full 10s on the way down, but it’s okay if you can only make the lowering 2-5s in the beginning.
The video shows a good example of an athlete using a jump to get up to the top and then lowering under control.
Torque Bar No Throws
This video from Nick Del Bianco has excellent demonstration of the No Throw drill:
You can use your Torque Bar for this. Try it unloaded at first to get a feel for it and add a 2.5lb weight as you get comfortable.